Tuesday, December 18, 2012

Sphere Update 1

After a few tweaks to the sphere, I've started in on the shadows. So far they look bad but with some more blending, erasing and shaping they should be good. It's difficult to get things the way you want because I tend to either change things too much or not enough.

Color Blending

 Yellow, Red, Blue blend
Blue, Black, Red blend

Using the brush on very low flow (1-5%) and a little bit of a lowered opacity (60-80%) I was able to blend the colors efficiently. I overlapped the colors and selected the resulting color in the middle to blend and continued with that process.
PS. It looks a lot better than this. The files must have lost some quality when converted to jpeg.

Brushes

Some more experimenting with brushes! I made the stars by modifying the brush to have a high scatter so that I could paint several at once rather than painting each individual one. I also decided to create a planet because I wanted to practice making spheres. I like the look of it and made it smudged to give it a natural look. It reminds me of Mars. I also put in some ambient white light in the background by using a large brush with low opacity to lighten it up a bit.

Sphere

I've just started making this 3D sphere. So far I have the basic shape and general idea of shadow (it helped to use a mask so that I was only able to color within the circle) but there is plenty more work to be done. I still need the ground shadow, ambient shadow, specular highlight, etc, and better blending in general.

Brushes

Here is another experiment with brushes. I upped the size of different brushes to the point where they were square-ish with 90 degree angles. By lowering the opacity I was able to get different shades by simply layering them on top of each other. This created a cool camouflage effect so I went with it. I also made it smudged at the end by using another brush at a large size.

Monday, December 10, 2012

Brushes


Here I was experimenting with the different brushes and settings. First I set down a general idea of what I wanted, then painted on some grass with the grass paintbrush. After that was the fun part: the clouds. I knew that I had to make them wispy and see through like natural clouds so I turned down the hardness and erased a lot.

Friday, November 30, 2012

One Point Perspective Room

Here is the room complete with door and window! The same concept applies for both the door and window. You just have to know your lines and it isn't that hard.

Wednesday, November 28, 2012

One Point Perspective Room

Here is the simple one point perspective room with the guides (red). I just followed the directions and it was pretty easy to do and understand.
One thing I would like to mention is that it definitely helped me understand how to create real life 3D scenes that have depth to them.

Monday, November 26, 2012

One Point Perspective


Here is an example of one point perspective photography with a vanishing point. The horizon is shown in green. The natural lines of the photo leading to the vanishing point are shown in red. The vanishing point is shown in blue and seemed to be where the lines intersected.. The vertical lines are the rulers shown in light blue (I used the end of the bridge support beams and the end of the trees).

Tuesday, November 13, 2012

Haunted House Update 4

Today I continued to work on making the house look more run down, focusing on windows and shutters.


Wednesday, November 7, 2012

Haunted House Update 3

I've finally started to get a decent background going and I am still continuing to blend the house in. A creepier sky that will fit well is still needed, but it now has some fog and creepy trees. I am still looking for good bushes or tall grass or something of the sort to place in front of the house to help blend it in. I've also started on destroying the house a little by beginning to break the windows and make them look old. The lighting definitely needs to be fixed but I'm going to do that near the end when I have everything constructed.


Animated GIF

Here is the animated .gif I created of a flying bird along with the original image used. It was really easy and quick to do. I first edited out all the numbers and separated each frame into separate layers. Then I opened up the animation editor and put each separate frame in. Finally, to make it look natural and smooth I set the the time that each frame is shown to 0.1 sec and then saved it as a .gif image.

Tuesday, October 23, 2012

Haunted House Update 2


Today I managed to clean the house up quite a bit. I removed a lot of branches and other things that were obstructing the view of the house by copying/pasting sections of the house, as well as by using the healing brush tool and paintbrush. Next class I will finish up the last bits that need to be fixed and begin to look for backgrounds and foregrounds I can use to establish the setting of the house.

Wednesday, October 17, 2012

Haunted House Update 1

Today I cropped out the house as well as started to remove the pole/wire on the right side of the house that is attached . I'm going to use other parts of the house to reconstruct it.

Monday, October 15, 2012

Final - Spider-Doo

Finally, I'm done with Spider-Doo! Hopefully the quality of the image isn't too bad.
The final steps I took after putting on Scooby's face, coloring it, and stealing the webbing from Spiderman's face and warping/liquifying it were to color it. I colored in the webbing to make it more natural and at times I even painted on my own webbing rather than copying and pasting it. I matched the webbing using the surrounding areas, paying attention to where the light would be shining. One trouble I had was deciding what to do around the mouth since it is so wide and goes to the left pretty far down Scooby's face. I originally had the webbing go over it but I decided to work the webbing to go around it. Overall, I feel like I did a decent job.

Thursday, October 11, 2012

Spider-Doo Update 4

I have shaped the webbing to Scooby's face and replaced the gap where Spiderman's eye originally was. At this point, it's time to get down the shading correctly, which I've already partly done. A little more touch ups and soon it should be done!

Friday, October 5, 2012

Spider-Doo Update 3

Now I am beginning to fit the webbing to Scooby's face. I warped and masked the webbing to get the general fit that I want down. Next I'm going to liquify it as well for more specific changes. After I get the shape of it down I will need to reconstruct the open space where Spiderman's eye originally was.

Wednesday, October 3, 2012

Haunted House


Here are a few houses that I would like to transform into a haunted house. I like the peaks and pointy parts of them and they would fit for a good looking and ancient haunted house. I like the 2nd and 5th ones the best. The other ones are decent too but they just don't have that certain feel that I'm looking for.

Monday, October 1, 2012

Spider-Doo Update 2

Cutting out the webbing of the face:

Spider-Doo Update 1

Last class I got up to this point. I cut out the head of Scooby-Doo and positioned it to fit on Spiderman's body and over his head (I had to warp the original Spiderman's head so that it would be completely covered by Scooby's). I also altered the hue/saturation of the fur so that the color of the head matched the body.
Now I'm going to start on the webbing covering the face.

Thursday, September 27, 2012

SPIDER-DOO


Here are the two images I'm going to use to create "Spider-Doo" (Spiderman/Scooby-Doo). They are both high quality large pictures with similar angles and lighting so that should make it a bit easier and better looking in the end. I wanted to use different ones but the school has blocks on certain websites so I could not access them.

Tuesday, September 25, 2012
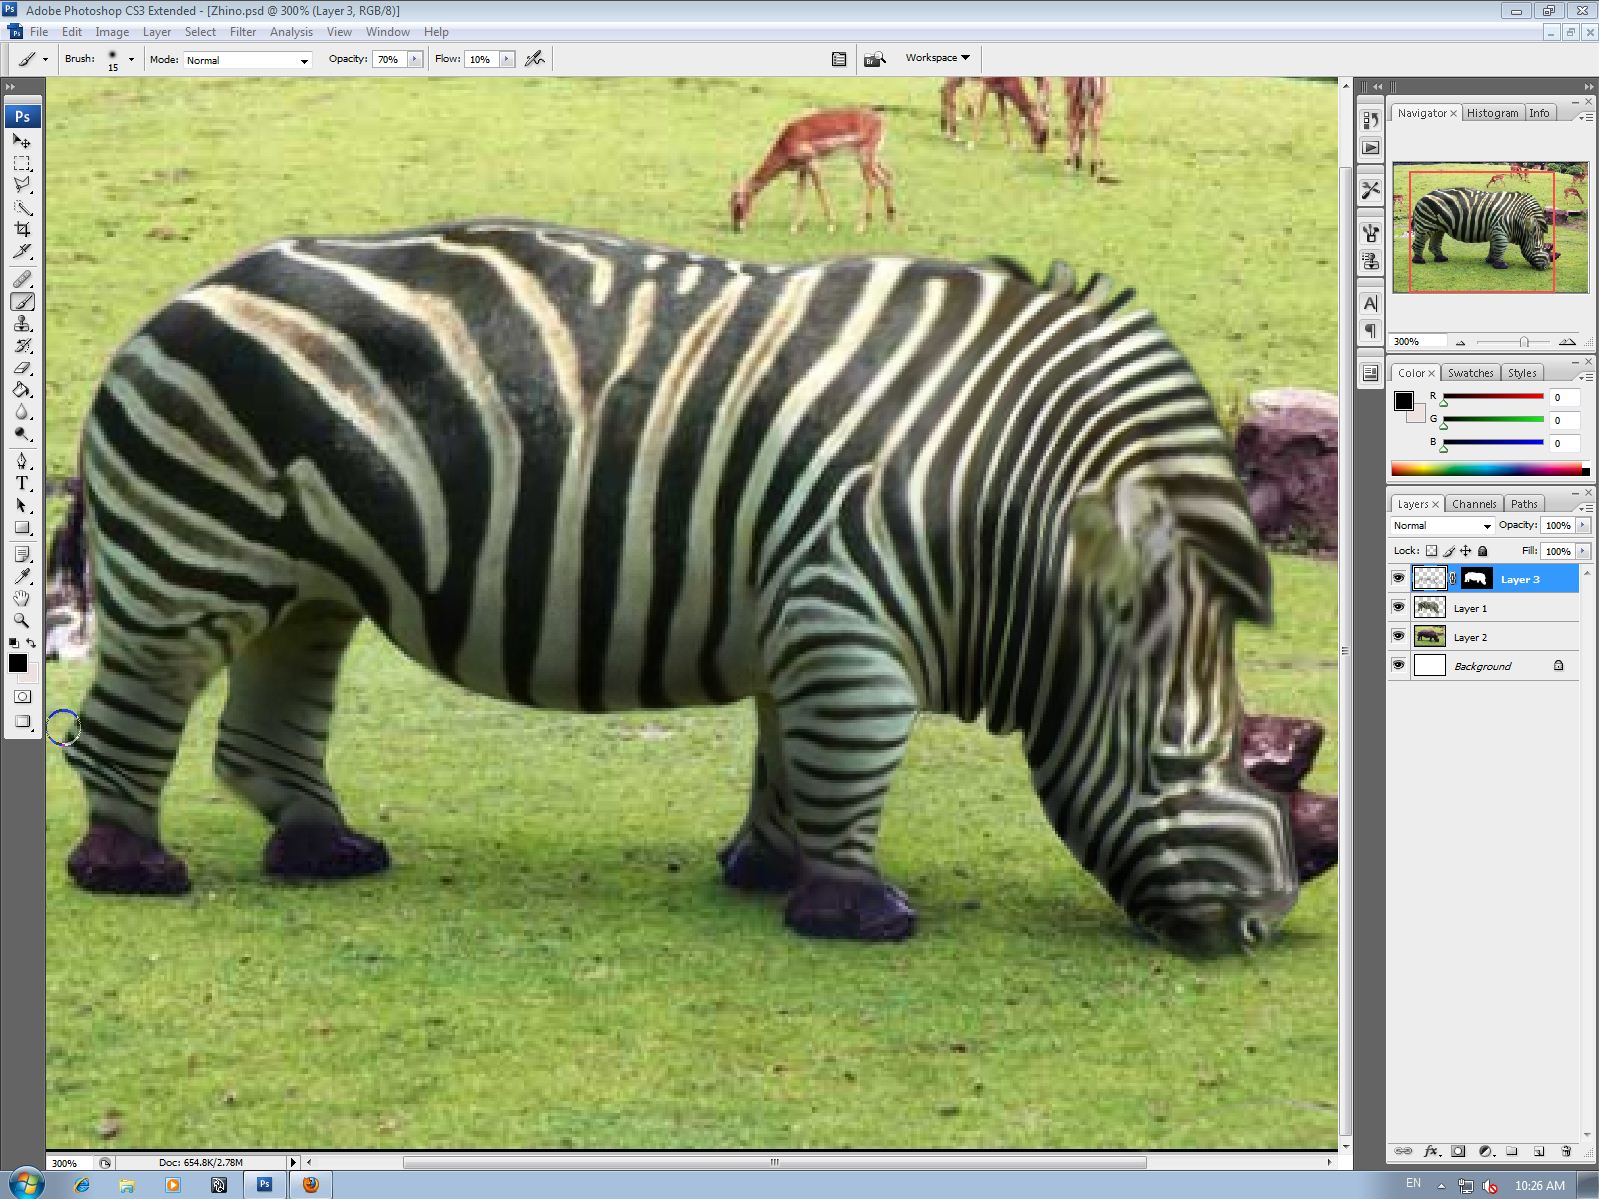
Final - Zhino

Here's my final version of the zhino. After shading a bit more I was able to get a desirable result. The shading really made him look a bit more bulky like a rhino is.
I had a little trouble with making the horns look like they were actually attached so I darkened on and around the base of them to give a more natural look in addition to changing the hue/saturation of them so that they were more black and white like the zebra rather than their original brown.
It could always be better, but I'm satisfied.

Zhino Update 2

 I've cropped the legs of the zebra so that they fit the size of the rhino. I didn't want to try to squish the legs upwards because the striping would look very unnatural. I used a feather to make the legs blend in with the rhino's feet.
After the body was finally fit I began to shade with a new layer mask. I used about 5% flow and 100% opacity a majority of the time. The main focus of shading will be to give a natural effect of bulkiness that a rhino has. Some more work on shading should make this zhino look like a much more realistic and believable creature.

Tuesday, September 18, 2012

Zhino Update

Today I worked on reworking the shape of the zebra to fit the rhino. The head took a long time to get right. I had to restart because it became too warped and the eye and ear didn't look right. Now it is looking better along with the legs as well.

Friday, September 14, 2012

Zhino (Zebra/Rhino)

 I cropped out the zebra using the polygonal lasso tool.
Now I am beginning to liquify the zebra to the shape of the rhino. I roughly warped it first so that I would not have to liquify it so much. I still have to do the legs and head/neck area as well as fixing up the shoulders because they don't look very natural as of now.

Wednesday, September 12, 2012

Final - Statue of Liberty (Lasso)


Today I finished up the statue of liberty project. It helped me to contrast it to a white background sometimes. I used the polygonal lasso tool the entire time.

Monday, September 10, 2012

Statue of Liberty (Lasso Tool)

I've just started on removing the sky today because I was working on the dog project for a while first. I'm making decent progress and will be done soon.
Today I learned there are
a few ways to remove pixels from an image (lasso, magic wand, etc.)


Final - Dog (Healing Brush)

 Today I finished up the dog project by getting rid of the large pole and some of the other smaller things. I just used the healing brush tool, switching back and forth between the normal and replace options and I was able to do it easily enough.
                  
                  Final:

Thursday, September 6, 2012

Dog (Healing Brush)

- Original image:

My progress so far:

I have taken out the telephone poles and wires, the man mowing the grass, and the object that was lying on the side of the road by using the healing brush tool. I still have to take out the large pole on the left side of the image, as well as a few other small things and I should be done.